
When the hot summer season winds down, a few simple checks can put your AC into hibernation the right way. Skipping end-of-season maintenance leaves the system exposed to rust, pests, and drain line clogs that are much easier to prevent now than to fix next spring.
Here are the eight steps to work through before the first hard freeze, plus a professional tune-up tip that routine checks might miss.
Step 1: Clear Debris Around the Outdoor Unit
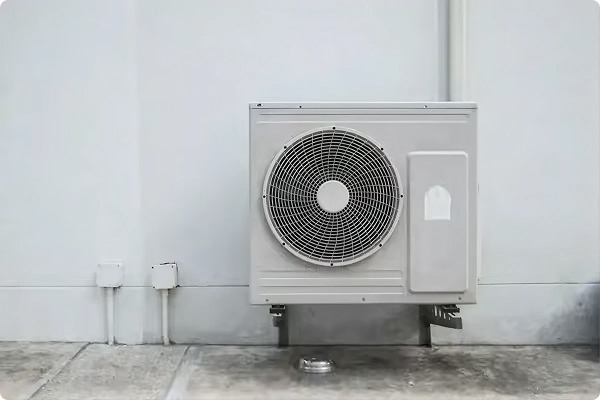
The outdoor condenser has been collecting leaves, twigs, cottonwood fluff, and grass clippings all summer. Fall adds more debris as trees and shrubs drop their leaves. Left in place through winter, that debris traps moisture against the unit, encouraging rust and creating a rodent habitat inside the housing.
What to do:
- Clear at least 2 to 3 feet of open space on every side of the unit
- Remove leaves, twigs, and pet hair from the fins
- Trim back shrubs, grasses, and vines that regrew over the summer
- Check underneath and behind the unit for objects that migrated over during the season
Don’t forget the top of the unit. Debris that collects there can freeze in place over the winter and is harder to remove come spring.
Step 2: Clean the Condenser Coils
The condenser fins have been releasing heat all summer and tend to get caked with pollen, dust, and grime. Cleaning them with a garden hose before winter keeps the coils in good shape for next season.
Before cleaning, cut power to the unit:
- Find the outdoor disconnect box, which is a small metal box mounted on the wall near the condenser, and switch it off.
- Wait 5 minutes before touching anything to allow internal electrical components to safely discharge.
- Confirm the fan has fully stopped spinning before proceeding.
Then clean:
- Vacuum loose debris off the exterior fins with a soft brush attachment.
- Spray the exterior fins with a garden hose at moderate pressure, directing the water from the top down to rinse debris out through the bottom.
- Avoid spraying directly on electrical components at the top of the unit.
- Let the unit fully dry before restoring power.
Never use a pressure washer. The high pressure can permanently bend the aluminum fins, which reduces the system’s efficiency the following season.
Step 3: Don’t Fully Cover the Outdoor Unit
Fully wrapping an outdoor central AC unit for winter is a bad idea. A full cover traps moisture, which invites pests and causes rust to form on the coil fins.
A partial top-only cover is fine on a central AC condenser. A piece of plywood or a manufacturer-approved top cover shields the unit from falling ice and heavy debris without trapping moisture the way a full wrap would.
Mini-split outdoor units are a different story. Never cover a mini-split, even partially, since it runs year-round for both cooling and heating and always needs airflow.
Step 4: Replace or Clean the Air Filter
Fall is a good time to install a fresh air filter. How often to change your filter depends on the type:
- Disposable pleated (MERV 8 to 11): every 1 to 3 months
- HEPA (MERV 13 and above): every 3 to 6 months
- Washable: rinse monthly during heavy use
Homes with pets, smokers, or allergies benefit from monthly changes. Even if the AC won’t run much between now and spring, replacing the filter now means the furnace, which uses the same filter housing in most homes, starts winter with fresh airflow.
Step 5: Check and Clean the Condensate Drain Line
Your AC produces condensation as it cools the air, and that water drains through a small white PVC pipe, usually running to a floor drain or outside the home. Algae and dust can build up inside that line over time. A clog left in place over winter can cause water damage as soon as the AC starts running again in spring.
Here’s how to clear it:
- Find where the drain line exits the house, usually a small white pipe coming through an exterior wall near the indoor unit.
- Attach a wet/dry shop vac to the outdoor end and run it for 2 to 3 minutes to pull out any buildup.
- Back inside, find the cleanout access, which is a small, capped opening on the drain line near the indoor unit. Remove the cap and pour a cup of distilled white vinegar down the opening to prevent algae from growing back.
Step 6: Inspect Refrigerant Lines for Insulation Damage
The two copper lines running between the outdoor condenser and indoor unit carry refrigerant. The larger of the two, called the suction line, is wrapped in black foam insulation. That insulation can degrade over time from UV exposure, weather, and small animals.
Signs the insulation needs attention:
- Cracked, brittle, or missing foam wrap
- Visible copper on the larger line
- Loose insulation flapping in the wind
Foam insulation is relatively inexpensive and doesn’t take long to replace. If the damage is minor, wrapping the affected area with foil tape can protect it through the winter.
Step 7: Test the Thermostat Before Shutting Down for the Season
Before switching the thermostat over to “Heat” for the season, test that the AC is still fully functional. Catching a problem now means it can be fixed before it becomes an emergency in spring.
Quick test:
- Set the thermostat to “Cool” and lower the temperature 3 to 5 degrees below the current room temperature
- Confirm the outdoor unit kicks on within a minute
- Verify cool air comes from the vents within 5 minutes
- Check for any new noises or odors
Then switch to “Heat” and repeat the same test with the furnace or heat pump. If anything sounds off during either test, schedule a service call before winter sets in.
Step 8: Schedule a Professional Fall Tune-Up
The seven steps above cover what a homeowner can see and reach. A professional fall tune-up covers the internal work that can’t be safely done without professional tools, and it typically takes only 60 to 90 minutes.
Most manufacturers require annual professional service to keep the warranty active. For year-round scheduled care on HVAC, plumbing, and electrical systems, the Happy Home Club includes scheduled service and 20% off HVAC repairs for $14.95 per month.
Frequently Asked Questions
When should I do end-of-season maintenance on my AC?
Before the first freeze of the season, typically between mid-September and late October in the Twin Cities. Doing it while daytime temperatures are still mild makes cleaning and testing much easier.
Should I turn off my AC breaker for winter?
It’s optional. Some HVAC pros recommend flipping the outdoor disconnect off to prevent accidental startup on unseasonably warm winter days. It doesn’t provide much winter protection beyond that.
Does my AC need a cover in winter?
Most central AC condensers don’t need a cover. A partial top-only cover is useful in areas prone to falling ice. Never use full wraparound covers, tarps, or shrink-wrap. Mini-split outdoor units should never be covered.
How often should I clean my condenser coils?
Once in the spring before the cooling season and once in fall as part of end-of-season maintenance is standard practice.
What happens if I skip end-of-season maintenance?
Skipping typically leads to rust, insulation damage, drain line clogs, and rodent nesting inside the unit. Any of those can cause a service call in spring that a 30-minute checklist would have prevented.
Schedule Your Fall AC Tune-Up with Hero
Whether it’s a quick fall tune-up, a coil cleaning before winter, or a full system evaluation, Hero Home Services is ready to help. We’ve been keeping Twin Cities homes comfortable since 1914. Call or text us to schedule AC maintenance before the first hard freeze.